Arduino Template Menu Eng

Simplify Complex Projects with a Test Menu on Arduino
When dealing with complex Arduino projects, such as reading multiple sensors, activating different procedures, or managing multiple outputs, writing a linear (flat) sketch can quickly become complicated. The complexity increases as we add new functions, sensors, or actuators. There is a risk of getting lost in the details, making errors that are difficult to diagnose, and having to solve a huge problem all at once. But there's a solution: break the project into small sub-problems and test them individually.
I developed a sketch template that follows exactly this philosophy. The goal is to make debugging and testing individual components of the project easier, avoiding tackling the entire problem all at once. The concept is simple: by typing the keyword "Menu" into the serial monitor, you access an interactive menu that allows you to test the various parts of the sketch individually.
Advantages of the Test Menu:
Debug Simplification:
Breaking the project into smaller blocks allows you to focus on one function at a time. For example, you can type "1" to test if the temperature sensor is working properly without worrying about the rest of the code.Modularity:
Each part of the project is tested and debugged independently. If a single module works, you know that component is reliable when integrated into the final project.Time Saving:
Diagnosing a problem in a complex sketch can be challenging. With an interactive menu, you can quickly isolate where the malfunction is, avoiding hours of searching for the bug in the full code.Better Understanding of the Project:
This approach helps you better understand how each part of your project behaves since every module works in isolation.Example of Operation
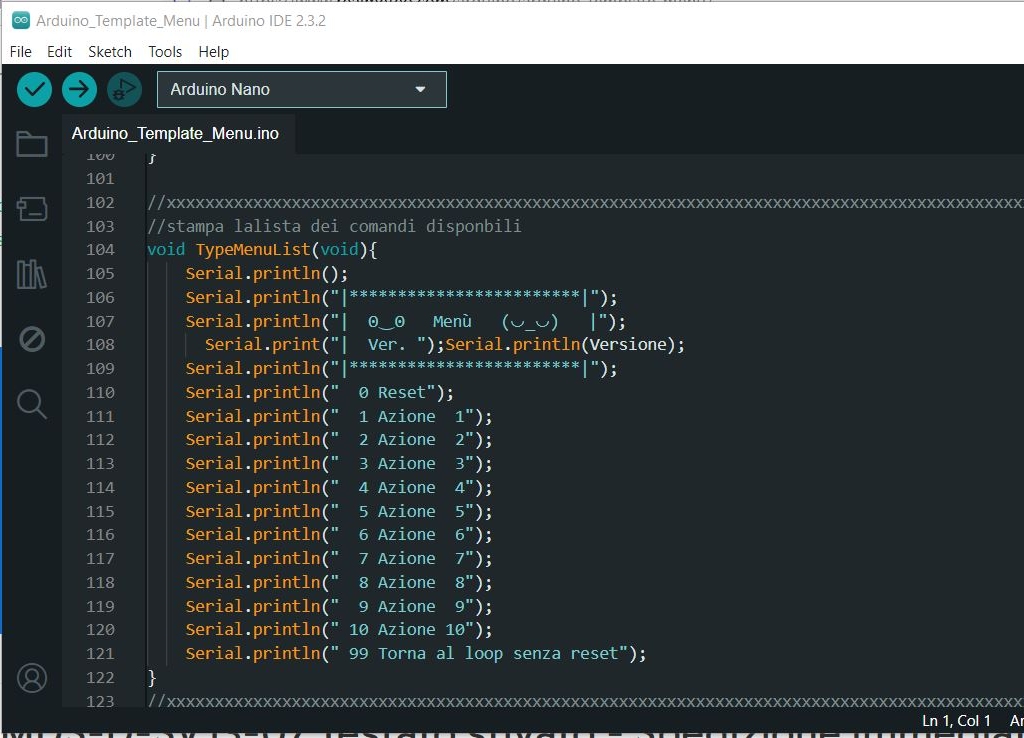
Once the sketch is launched, type "Menu" into the serial monitor, and a list of available commands appears. For example:
Command 1: Test if the temperature sensor returns correct values.
Command 2: Check if the thresholds of three different temperatures properly activate three relays.
Command 3: Verify the operation of a humidity sensor, and so on.
Each function can be tested and optimized before integrating it into the main project. This way, when you reach the final solution, you won't be facing a single large problem, but rather a set of small problems that have already been solved.
Conclusion
This method allows you to develop complex projects more efficiently and in an organized way. Testing each part individually gives you confidence and control, making the final integration much simpler. If you are working on complex Arduino projects, I recommend adopting this modular approach to simplify debugging and reduce errors.
/*
Template MENU for Arduino by Luciano Pautasso
This software is freeware and is released under the "MIT license" rules.
It is requested that the phrase "Template MENU for Arduino by Luciano Pautasso" is not removed.
*/

String Versione = "Template_Menu";
String inputString = "";         // a String to hold incoming data
bool stringComplete = false;  // whether the string is complete
bool ExitFromMenu = false;
char Cestino;

// constants won't change. Used here to set a pin number:
const int ledPin =  LED_BUILTIN;// the number of the LED pin

// Variables will change:
int ledState = LOW;             // ledState used to set the LED

// Generally, you should use "unsigned long" for variables that hold time
// The value will quickly become too large for an int to store
unsigned long previousMillis = 0;        // will store last time LED was updated

// constants won't change:
const long interval = 1000;           // interval at which to blink (milliseconds)

//--******************************************************************************************

void setup() {
   // set the digital pin as output:
   pinMode(ledPin, OUTPUT);

  //start serial connection
  Serial.begin(9600); // terminal
  Serial.println();
  Serial.println("Type Menu to enter the config menu.");
  Serial.print("Version ");Serial.println(Versione);
  Serial.println();
}

//--******************************************************************************************

void(* resetFunc) (void) = 0; //declare reset function @ address 0

//-------------------------------------------

void loop() {

  //--------------------------------------
  // BLINK MANAGEMENT EVERY 1 SECOND, TO SHOW THAT THE LOOP IS ACTIVE
  unsigned long currentMillis = millis();
  if (currentMillis - previousMillis >= interval) {
    // save the last time you blinked the LED
    previousMillis = currentMillis;

    // if the LED is off turn it on and vice-versa:
    if (ledState == LOW) {
      ledState = HIGH;
    } else {
      ledState = LOW;
    }

    // set the LED with the ledState of the variable:
    digitalWrite(ledPin, ledState);
    Serial.print(".");
  }
  //--------------------------------------
  // print the string when a newline arrives:
  if (stringComplete) {
    inputString.trim();
    Serial.println(inputString);
    //parse commands
    if ( (inputString.substring(0, 4) ) == "Menu" ) {
      Menu();
    }
    // clear the string:
    inputString = "";
    stringComplete = false;
  }
}

//*******************************************************

/*
  SerialEvent occurs whenever a new data comes in the hardware serial RX. This
  routine is run between each time loop() runs, so using delay inside loop can
  delay response. Multiple bytes of data may be available.
*/
void serialEvent() {
  while (Serial.available()) {
    // get the new byte:
    char inChar = (char)Serial.read();
    // add it to the inputString:
    inputString += inChar;
    // if the incoming character is a newline, set a flag so the main loop can
    // do something about it:
    if (inChar == '\n') {
      stringComplete = true;
    }
  }
}

//xxxxxxxxxxxxxxxxxxxxxxxxxxxxxxxxxxxxxxxxxxxxxxxxxxxxxxxxxxxxxxxxxxxxxxxxxxxxxxxxxxxxxxxxxxxxxxxxxx
//print the list of available commands
void TypeMenuList(void){
    Serial.println();
    Serial.println("|************************|");
    Serial.println("|  ʘ‿ʘ   Menu   (◡_◡)   |");
      Serial.print("|  Ver. ");Serial.println(Versione);
    Serial.println("|************************|");
    Serial.println("  0 Reset");
    Serial.println("  1 Action  1");
    Serial.println("  2 Action  2");
    Serial.println("  3 Action  3");
    Serial.println("  4 Action  4");
    Serial.println("  5 Action  5");
    Serial.println("  6 Action  6");
    Serial.println("  7 Action  7");
    Serial.println("  8 Action  8");
    Serial.println("  9 Action  9");
    Serial.println(" 10 Action 10");
    Serial.println(" 99 Return to loop without reset");
}
//xxxxxxxxxxxxxxxxxxxxxxxxxxxxxxxxxxxxxxxxxxxxxxxxxxxxxxxxxxxxxxxxxxxxxxxxxxxxxxxxxxxxxxxxxxxxxxxxxx

void Menu() {

  //stay in the menu until you press 0
  while (!ExitFromMenu) {

    TypeMenuList();

    //clear the buffer
    while (Serial.available()) {
      Cestino = Serial.read();
    }

    Serial.println(" ");

    // here the waiting and LED blinking loop until there is a character on the serial
    while (!Serial.available()) {

      //--------------------------------------
      // FAST BLINK MANAGEMENT TO SHOW THAT THE MENU IS WAITING FOR COMMANDS
      unsigned long currentMillis = millis();
      if (currentMillis - previousMillis >= interval/4) {
        // save the last time you blinked the LED
        previousMillis = currentMillis;

        // if the LED is off turn it on and vice-versa:
        if (ledState == LOW) {
          ledState = HIGH;
        } else {
          ledState = LOW;
        }

        // set the LED with the ledState of the variable:
        digitalWrite(ledPin, ledState);
    }
   }

   // a character has arrived
   int CmdMenu = Serial.parseInt();
   Serial.print("CmdMenu received ");Serial.println(CmdMenu);

   //XXXXXXXXXXXXXXXXXXXXXXXXXXXXXXXXXXXXXXXXXXXXXXXXXXXXXXXXXXXXXXXXXXXXXXXXXXXXXXXXXX

   //process the received command
	switch (CmdMenu){

      //-------------------------------------------------
      case 0:
        Serial.println("resetting in 1 sec");
        delay(1000);               // wait for a second
        resetFunc();  //call reset

        delay(100);
        Serial.println("Reset did not work");
      break;      //-------------------------------------------------
      case 1:
        Action1();
      break;
      //-------------------------------------------------
      case 2:
        Action2();
      break;
      //-------------------------------------------------
      case 3:
        Action3();
      break;
      //-------------------------------------------------
      case 4:
        Action4();
      break;
      //-------------------------------------------------
      case 5:
        Action5();
      break;
      //-------------------------------------------------
      case 6:
        Action6();
      break;
      //-------------------------------------------------
      case 7:
        Action7();
      break;
      //-------------------------------------------------
      case 8:
        Action8();
      break;
      //-------------------------------------------------
      case 9:
        Action9();
      break;
      //-------------------------------------------------
      case 10:
        Action10();
      break;
      //-------------------------------------------------
      case 99:
        Action99();
      break;
      //-------------------------------------------------
      default:
        Serial.println("Invalid command. Try again!");
    } //Serial.available
  } // ExitFromMenu
} // Menu

//*******************************************************

//--------------------------------------------------------------------------
//action n. 1
void Action1(){
  Serial.println("Action no. 1 selected");
  //insert your program lines here
  //insert your program lines here
  delay(2000);
  Serial.println("Action terminated, returning to the menu'");
  delay(2000);

}
//--------------------------------------------------------------------------
//action n. 2
void Action2(){
  Serial.println("Action no. 2 selected");
  //insert your program lines here
  //insert your program lines here
  delay(2000);
  Serial.println("Action terminated, returning to the menu'");
  delay(2000);
}
//--------------------------------------------------------------------------
//action n. 3
void Action3(){
  Serial.println("Action no. 3 selected");
  //insert your program lines here
  //insert your program lines here
  delay(2000);
  Serial.println("Action terminated, returning to the menu'");
  delay(2000);
}
//--------------------------------------------------------------------------
//action n. 4
void Action4(){
  Serial.println("Action no. 4 selected");
  //insert your program lines here
  //insert your program lines here
  delay(2000);
  Serial.println("Action terminated, returning to the menu'");
  delay(2000);
}
//--------------------------------------------------------------------------
//action n. 5
void Action5(){
  Serial.println("Action no. 5 selected");
  //insert your program lines here
  //insert your program lines here
  delay(2000);
  Serial.println("Action terminated, returning to the menu'");
  delay(2000);
}
//--------------------------------------------------------------------------
//action n. 6
void Action6(){
  Serial.println("Action no. 6 selected");
  //insert your program lines here
  //insert your program lines here
  delay(2000);
  Serial.println("Action terminated, returning to the menu'");
  delay(2000);
}
//--------------------------------------------------------------------------
//action n. 7
void Action7(){
  Serial.println("Action no. 7 selected");
  //insert your program lines here
  //insert your program lines here
  delay(2000);
  Serial.println("Action terminated, returning to the menu'");
  delay(2000);
}
//--------------------------------------------------------------------------
//action n. 8
void Action8(){
  Serial.println("Action no. 8 selected");
  //insert your program lines here
  //insert your program lines here
  delay(2000);
  Serial.println("Action terminated, returning to the menu'");
  delay(2000);
}
//--------------------------------------------------------------------------
//action n. 9
void Action9(){
  Serial.println("Action no. 9 selected");
  //insert your program lines here
  //insert your program lines here
  delay(2000);
  Serial.println("Action terminated, returning to the menu'");
  delay(2000);
}
//--------------------------------------------------------------------------
//action n. 10
void Action10(){
  Serial.println("Action no. 10 selected");
  //insert your program lines here
  //insert your program lines here
  delay(2000);
  Serial.println("Action terminated, returning to the menu'");
  delay(2000);
}
//--------------------------------------------------------------------------
//action n. 99
void Action99(){
  Serial.println("Action no. 99 selected");
  delay(2000);
  Serial.println("Returning to loop'");
  delay(2000);
  ExitFromMenu = true;
}
//--------------------------------------------------------------------------
L.Pautasso (contact: lpautas gmail) & I.A.
The ads on this page are boring, but they help us pay the server costs. If you click on one of them, you will also contribute to maintaining the site. THANK YOU

Categorie Articoli
Come-Trovare-Facilmente-l-Equivalente-di-un-Transistor
Corso-di-elettrotecnica-ed-elettronica-3-volumi
Libro-tutto-sull-audio---inglese
Libro-ELETTRONICA-FONDAMENTALE
Dove-acquistare-abbigliamento-risparmiando
Come-vedere-le-partite-sullo-smartphone
Come-difendersi-dagli-allegati-pericolosi-nelle-email
KEEPASS-un-posto-sicuro-per-le-nostre-PASSWORD
I-3-trend-estivi-del-2020-scopri-i-tagli-che-ti-stanno-meglio
Ultimi articoli
Come-copiare-1-TB-di-dati-su-WINDOWS APRI
Parallelatore-Camper APRI
Come-Trovare-Facilmente-l-Equivalente-di-un-Transistor APRI
Delaying-the-Switch-to-LPG APRI
Ritardare-la-commutazione-a-GPL APRI
OPTA-FINDER-ARDUINO-COMPATIBLE APRI
whatsapp-alarm-repeater APRI
Arduino_Template_Menu_Eng APRI
Arduino_Template_Menu APRI
Power-Supply-with-Current-Control APRI
Vantaggi_Alimentatori-Controllo_Corrente APRI
Camping-La-Secca-Moneglia APRI
Safety-Relays APRI
Rele-di-sicurezza APRI
Internal-or-External-Watchdog APRI
Watchdog-interno-o-esterno APRI
Ripetitore-di-allarme-su-Whatsapp APRI
Bufala-in-crosta APRI
Home-Automation-ESPeriment APRI
ESPerimento-Domotica APRI
Arduino-measures-liquid-level APRI
Arduino-misura-livello-liquidi APRI
finder APRI
LORA-english-version APRI
Pluviometro-LORA APRI
Pillole_di_Promessi_Sposi APRI
LORA APRI
promessisposi-riscrittura APRI
Arduino_crashes APRI
Arduino_si_blocca APRI