Arduino measures liquid level with a float sensor

Arduino measures liquid level with a float sensor
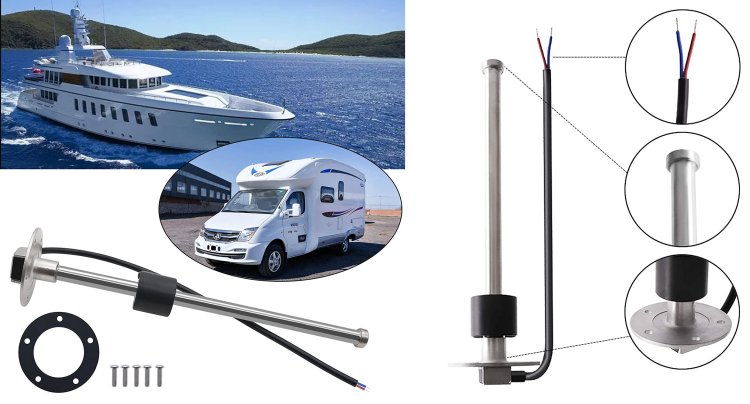
KAOLALI is the brand of the Liquid Level Sensor, which combined with Arduino, and a data transmission system, can be used to monitor the level of a liquid in a tank.As stated on the online shop (the largest of all, and I won't name names), the float sensor has a 316 stainless steel structure, and is suitable for fuel, water, kerosene, chemicals and many other types of liquid, without introducing impurities.
There are 5 standard SAE holes for installation, and it comes complete with a mounting flange and sealing gasket.
The first test was done with a simple tester, measuring the resistance across the sensor. The sensor does not have a linear and continuous indication of the position of the float, but has 11 fixed resistive steps, which still allow to understand the liquid level with sufficient precision for almost all applications. By moving the float along its entire stroke, starting from the highest point and then going down, the following resistance values (ohms) are detected: 190, 171, 152, 133, 114, 95, 76, 57, 38, 19, 0 .
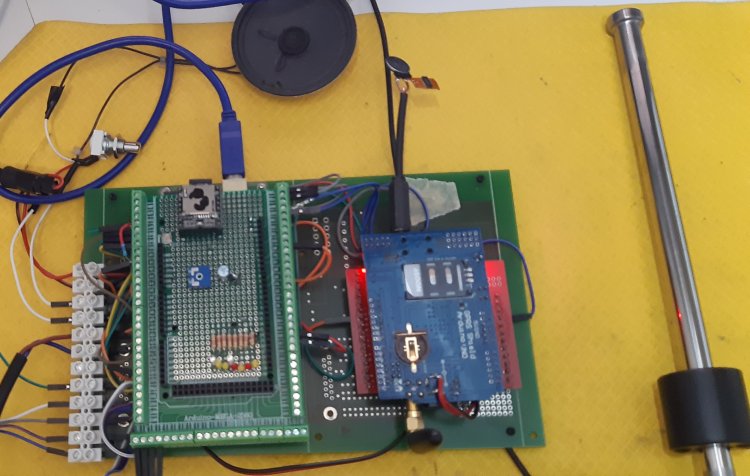
The two terminals of the sensor have been connected one to GND, and one to pin A0 of the Arduino, together with a 200ohm pullup, which creates a voltage divider, with an input voltage to the ADC equal to about 2.5v with the top float, which drops to 0 volts with the float all the way down.
Arduino with a simple instruction gives us back an integer that indicates the level of the liquid.
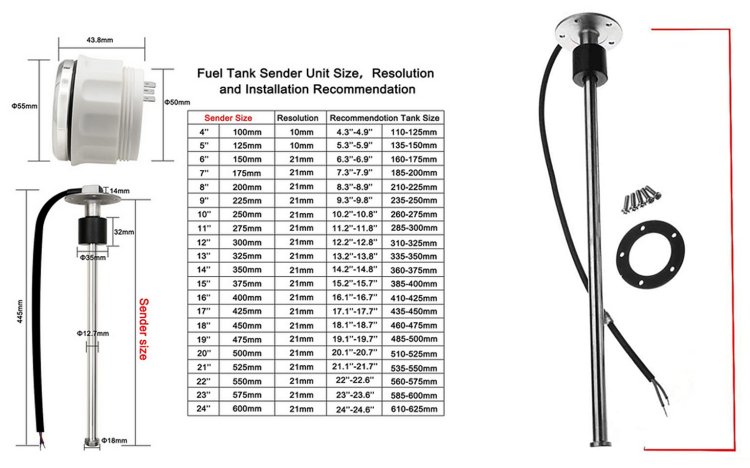
The sensor is sold with rods of different lengths, ranging from 100 to 600mm.
The test was done on the 175mm model, which has a net stroke of about 140mm, equal to a resolution of 13/14mm for each step.
By loading the sketch present in the "examples", "AnalogInOutserial.ino" , we can immediately read on the terminal a numeric value which indicates in some way the position of the float.
From here on, the road is all downhill, and it is simple to use the resulting number, communicating it in the way you prefer, like LoRa, or as in my case, via SMS using a Sim900 card.
These are the ADC values detected by moving the float with the instructions:
sensorValue = analogRead(analogInPin);
Serial.println(sensorValue);
step 10: 502 bit
step 9: 459 bit
step 8: 408 bit
step 7: 385 bit
step 6: 360 bit
step 5: 326 bit
step 4: 288 bit
step 3: 246 bit
step 2: 199 bit
step 1: 111 bit
step 0: 2 bit
To avoid false indications I set many thresholds, roughly halfway between two adjacent values
const int Threshold10 = 480 bit ;
const int Threshold9 = 433 bit ;
const int Threshold8 = 396 bit ;
const int Threshold7 = 372 bit ;
const int Threshold6 = 343 bit ;
const int Threshold5 = 307 bit ;
const int Threshold4 = 267 bit ;
const int Threshold3 = 222 bit ;
const int Threshold2 = 155 bit ;
const int Threshold1 = 56 bit ;
At this point the sketch is very simple, in the loop we put a series of if and esle if:
if (sensorValue > Threshold10){
Serial.println("The level is beyond step10");
}
else if (sensorValue > Threshold9){
Serial.println("The level is beyond step9");
}
else if (sensorValue > Threshold8){
Serial.println("The level is beyond step8");
}
else if (sensorValue > Threshold7){
Serial.println("The level is beyond step7");
}
else if (sensorValue > Threshold6){
Serial.println("The level is beyond step6");
}
else if (sensorValue > Threshold5){
Serial.println("The level is beyond step5");
}
else if (sensorValue > Threshold4){
Serial.println("The level is beyond step4");
}
else if (sensorValue > Threshold3){
Serial.println("The level is beyond step3");
}
else if (sensorValue > Threshold2){
Serial.println("The level is beyond step2");
}
else if (sensorValue > Threshold1){
Serial.println("The level is beyond step1");
}
else {
Serial.println("The level is lower than step1");
}
Obviously, in addition to the Serial.print, in the various ifs we can put anything, such as relay activation, buzzers, sending sms messages, or whatever.
The banner ads on this page are boring, but they allow us to pay for server fees. If you click on one of them, you will also contribute to the maintenance of the site. THANK YOU


Categorie Articoli
Come-Trovare-Facilmente-l-Equivalente-di-un-Transistor
Corso-di-elettrotecnica-ed-elettronica-3-volumi
Libro-tutto-sull-audio---inglese
Libro-ELETTRONICA-FONDAMENTALE
Dove-acquistare-abbigliamento-risparmiando
Come-vedere-le-partite-sullo-smartphone
Come-difendersi-dagli-allegati-pericolosi-nelle-email
KEEPASS-un-posto-sicuro-per-le-nostre-PASSWORD
I-3-trend-estivi-del-2020-scopri-i-tagli-che-ti-stanno-meglio
Ultimi articoli
Come-copiare-1-TB-di-dati-su-WINDOWS APRI
Parallelatore-Camper APRI
Come-Trovare-Facilmente-l-Equivalente-di-un-Transistor APRI
Delaying-the-Switch-to-LPG APRI
Ritardare-la-commutazione-a-GPL APRI
OPTA-FINDER-ARDUINO-COMPATIBLE APRI
whatsapp-alarm-repeater APRI
Arduino_Template_Menu_Eng APRI
Arduino_Template_Menu APRI
Power-Supply-with-Current-Control APRI
Vantaggi_Alimentatori-Controllo_Corrente APRI
Camping-La-Secca-Moneglia APRI
Safety-Relays APRI
Rele-di-sicurezza APRI
Internal-or-External-Watchdog APRI
Watchdog-interno-o-esterno APRI
Ripetitore-di-allarme-su-Whatsapp APRI
Bufala-in-crosta APRI
Home-Automation-ESPeriment APRI
ESPerimento-Domotica APRI
Arduino-measures-liquid-level APRI
Arduino-misura-livello-liquidi APRI
finder APRI
LORA-english-version APRI
Pluviometro-LORA APRI
Pillole_di_Promessi_Sposi APRI
LORA APRI
promessisposi-riscrittura APRI
Arduino_crashes APRI
Arduino_si_blocca APRI